Automatic-check equipment which replaces visual check by sampling
The merits of inspecting by PIE-C®3
Reliability of inspection accuracy
- Errors by measurement person will be lost.
- it has great data reliability and excellent inspection accuracy.
- Operation is easy and inspection with a color camera is possible at approx. 15minutes (100g sample). (Resolution; around 20μm, Execution power; 50μm guaranteed)
Objectivity of inspection data
- It can be employed in sharing of data and it is compatible with other companies.
- It can load detected foreign material images to the accompanied PC, enabling easy management of foreign material images.
Economical efficiency and working efficiency
- Operation is easy and it can perform processing of a sample for a short time.
- There are fewer actual working hours and other tasks can be done in parallel.
- Reduction of inspection processes is possible.
- Measurement person's fatigue will be lessened.
| Machine name |
PIE-C®3 |
| Machine overview |
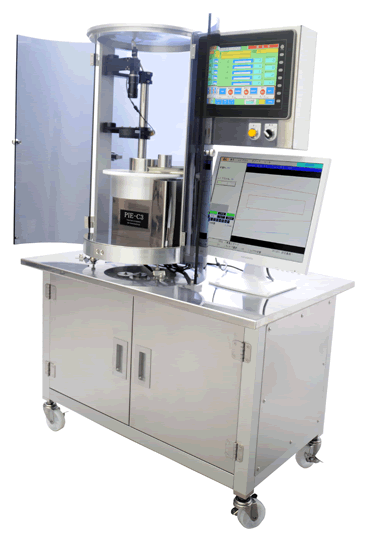
- The cylindrically filled powder rises while rotating, and the certain quantity (average 0.171mm) is scratched with a scraper and the newly appeared surface of powder is inspected.
- Foreign material (more than 50μm) in powder can be detected through its CCD two-dimensional camera.
- If the foreign material is detected, the machine can be stopped temporarily, enabling the confirmation of detection. Also, if the confirmation of detection is not necessary, the machine can run automatically.
|
| Inspection functions |
Powder for inspection |
Fluid and scrapable powder |
| Inspection processing time |
Around 450 seconds per 1m² |
| Accuracy of inspection |
Deep-colored foreign material of more than or equal to 50μm angle on surface can be inspected. Black dots, metal, fiber, hair etc. |
| Detailed specifications |
Illumination |
LED illumination |
| Read camera |
CCD two-dimensional camera |
| Image pickup device |
2-million pixel camera (1,600px×1,200px) |
| Number of camera |
1 |
| Power source |
AC 100V 50/60Hz |
| Power consumption |
Less than or equal to 300VA |
| Machine dimension |
W 900mm×D600mm×H1,450mm |
| Volume of powder |
Minimum: around 123,150mm³ Maximum: around 475,000mm³ |
| Accessory functions |
- The inspection results can be exhibited in figure by the size of foreign material, and maximum, minimum and average value as well as failed images can be sent to its dedicated computer.
- The brightness value is displayed on the screen to check time degradation of camera and illumination constantly.
- The inspection conditions of maximum 60 items can be fixed and registered, enabling to switch between items easily.
|
| Materials |
The part in contact with the powder |
SUS316, aluminum material, resin |
| Outer cover |
SUS304, aluminum material (surface treatment・white alumite), acrylite |
| Other part |
SUS304・430, aluminum material (surface treatment・white alumite) |


